Chat Bubble
Put an AI chat bubble on your website that answers from your own pages and connected knowledge, recommends products on a store, and hands a visitor to your helpdesk when they ask for a person.
The chat bubble puts your AI teammate on your website. It answers from your own site, help center and everything else you have connected, and links the page it used. On a store it recommends products, checks stock, looks up an order and hands the conversation to a person.
You stay in control the whole way. Each action your agent can take runs on its own, asks you first, or stays off.
Quick start
Ask your agent for a chat bubble
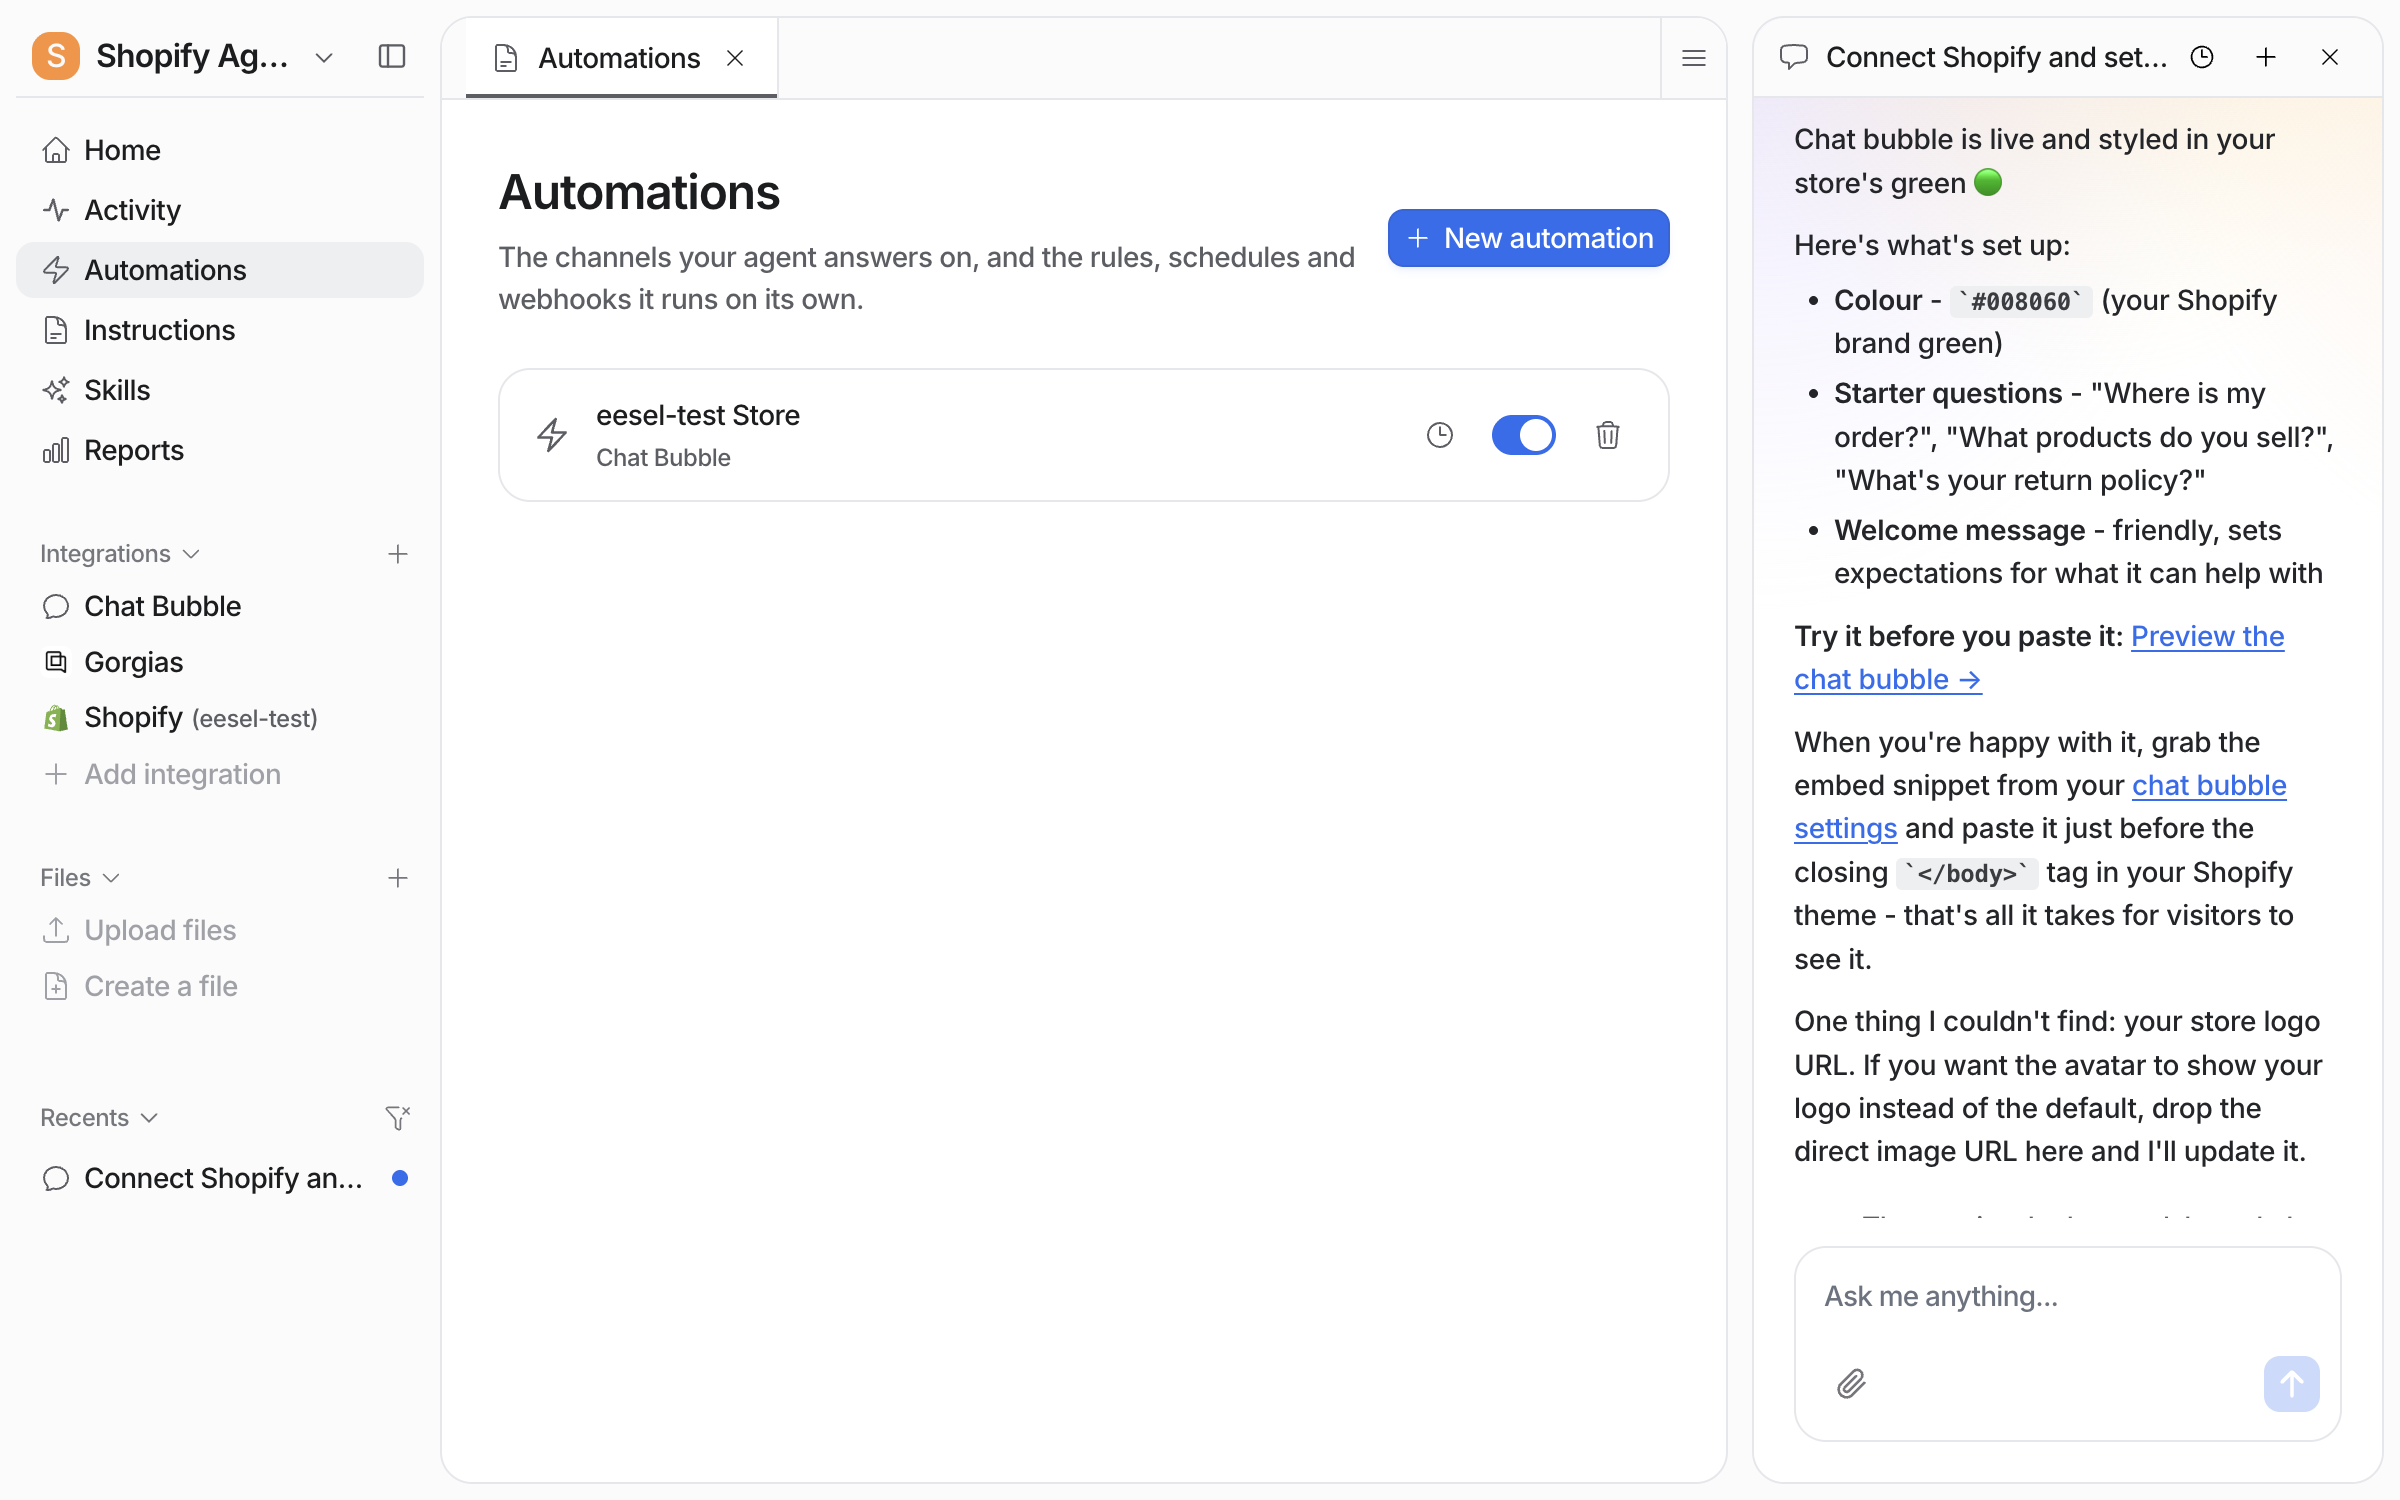
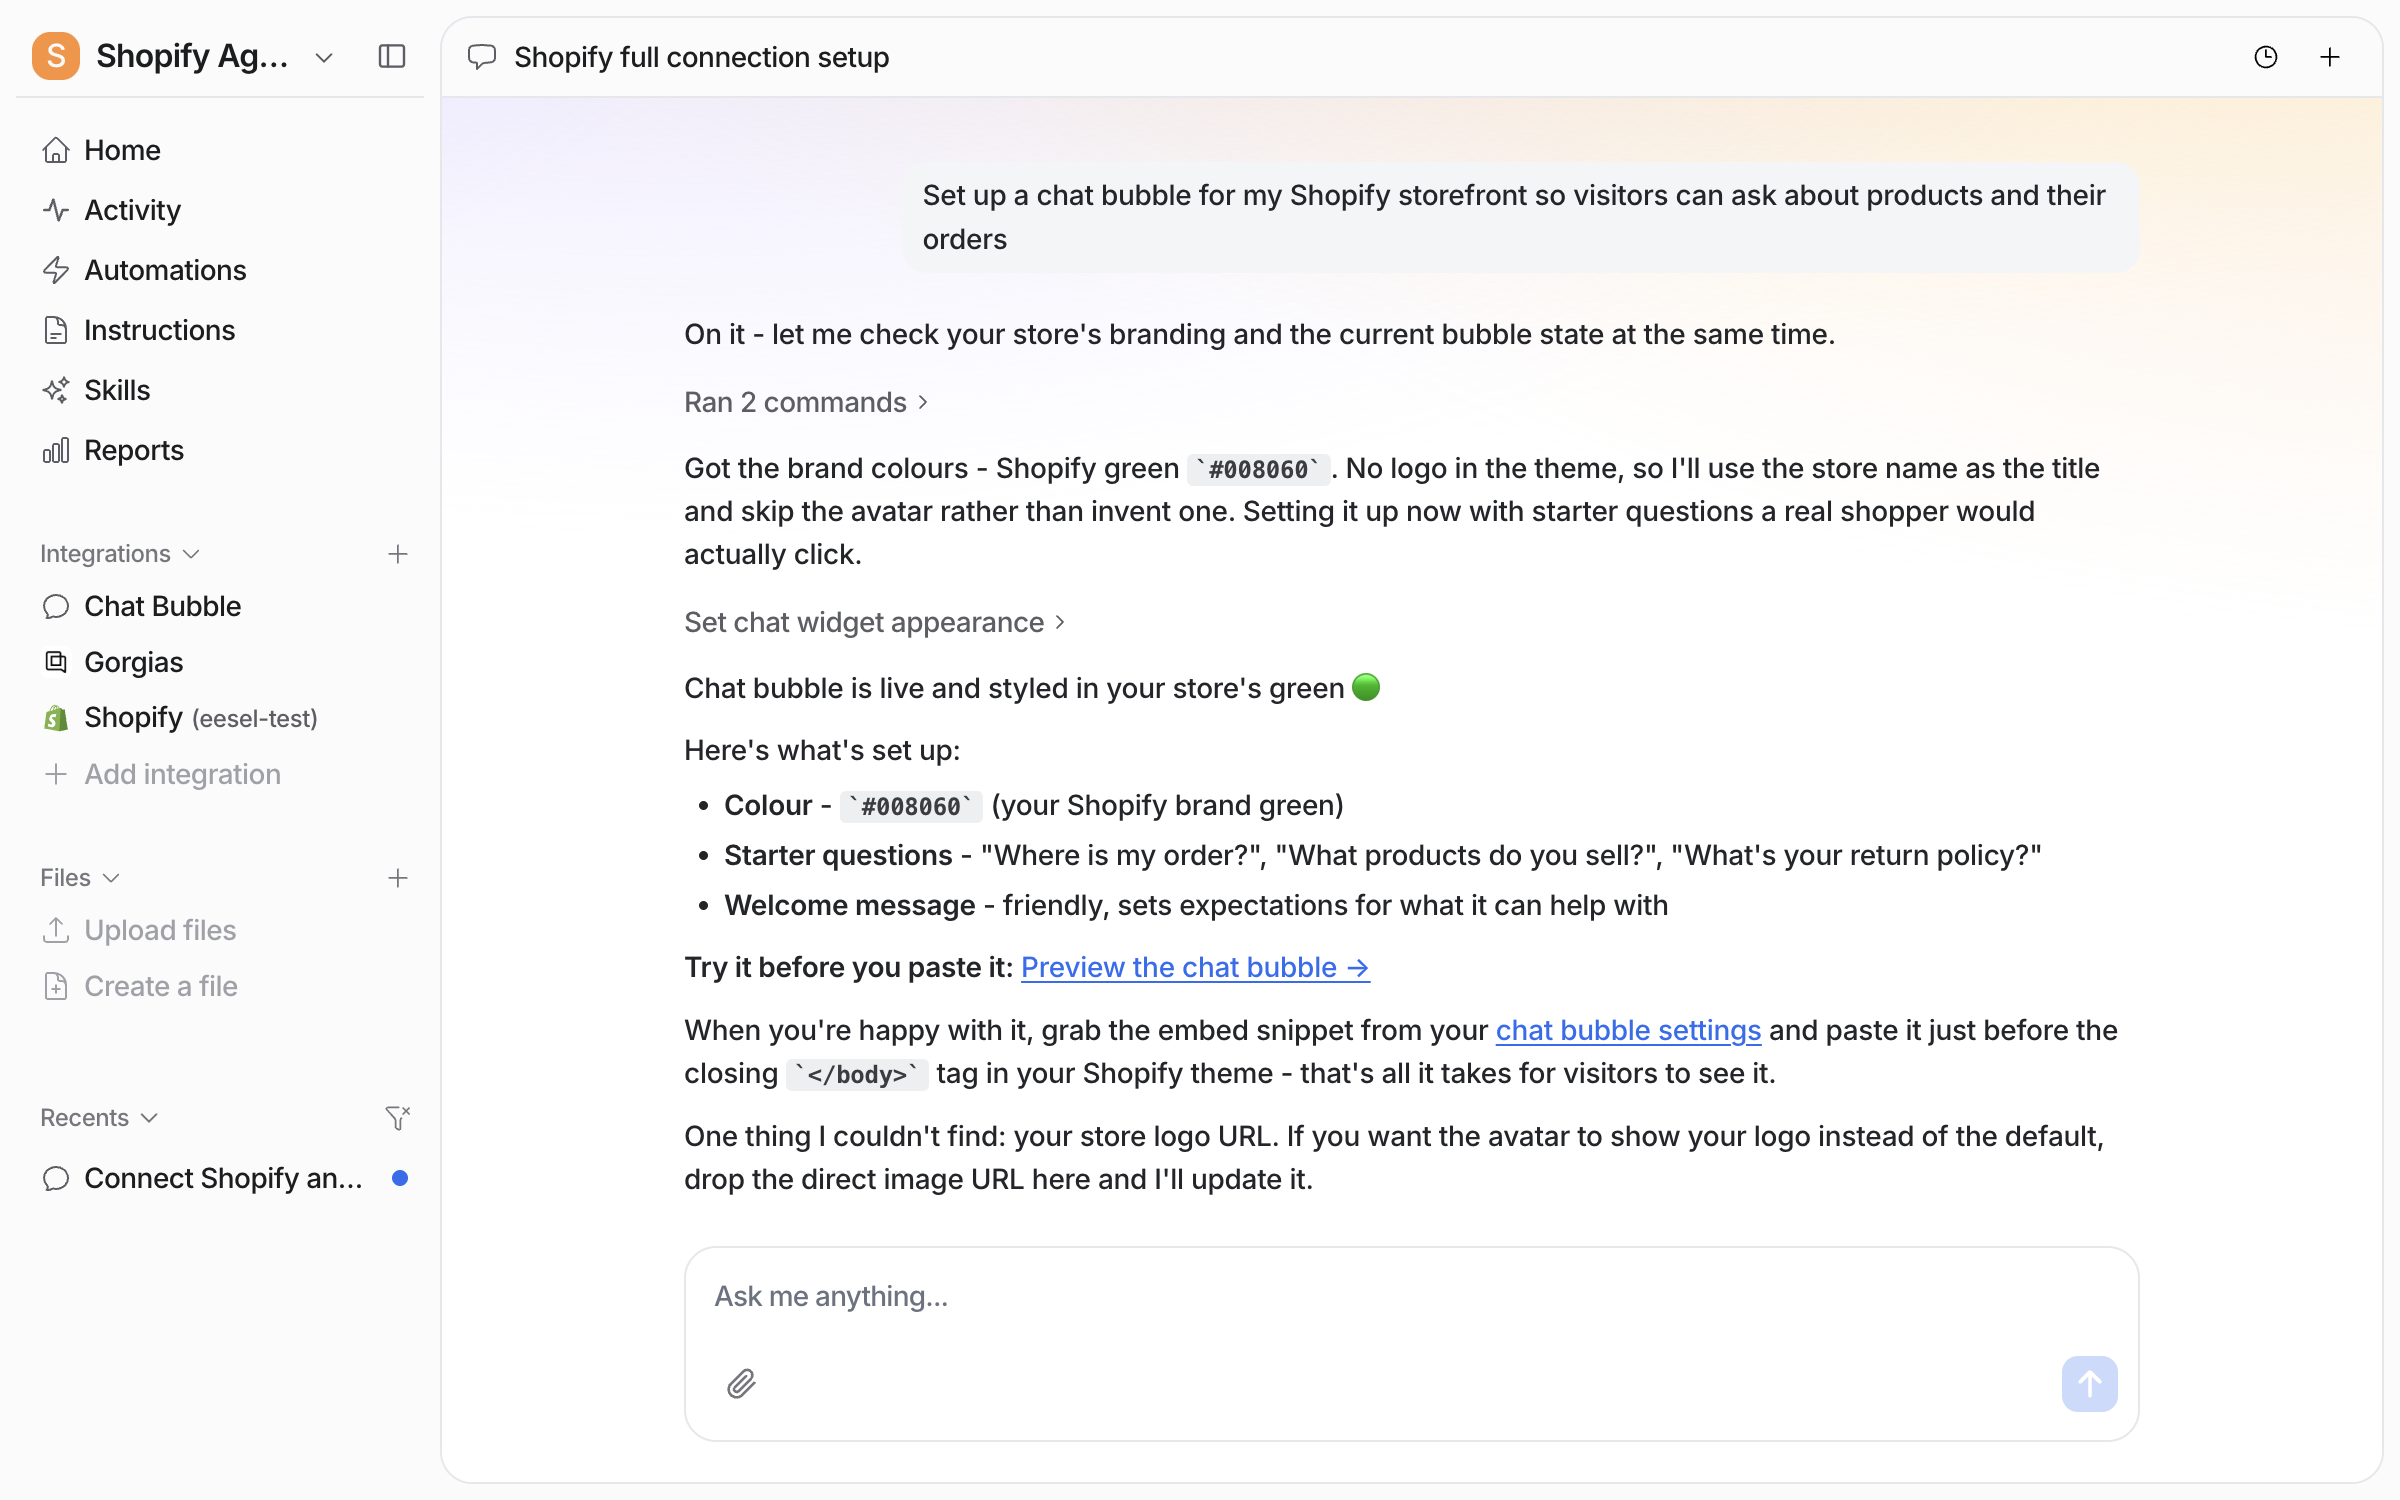
Open the chat in your dashboard and ask for a chat bubble on your site. Your agent reads your site's brand colour, then sets the bubble up with a title, a welcome message and three starter questions. It posts a preview link and points you at the settings page with the embed snippet. It tells you about anything it could not find, such as a logo image.

Check it worked. The left sidebar now lists Chat Bubble under Integrations. From a terminal, eesel status lists it on your agent.
Check it on your Automations page
The chat bubble is its own automation, created and switched on when the bubble is set up. Your Automations page lists it under the bubble's name, so you can pause it without touching your site's code.

Check it worked. From a terminal, eesel automations lists the automation as on.
Shape it in settings
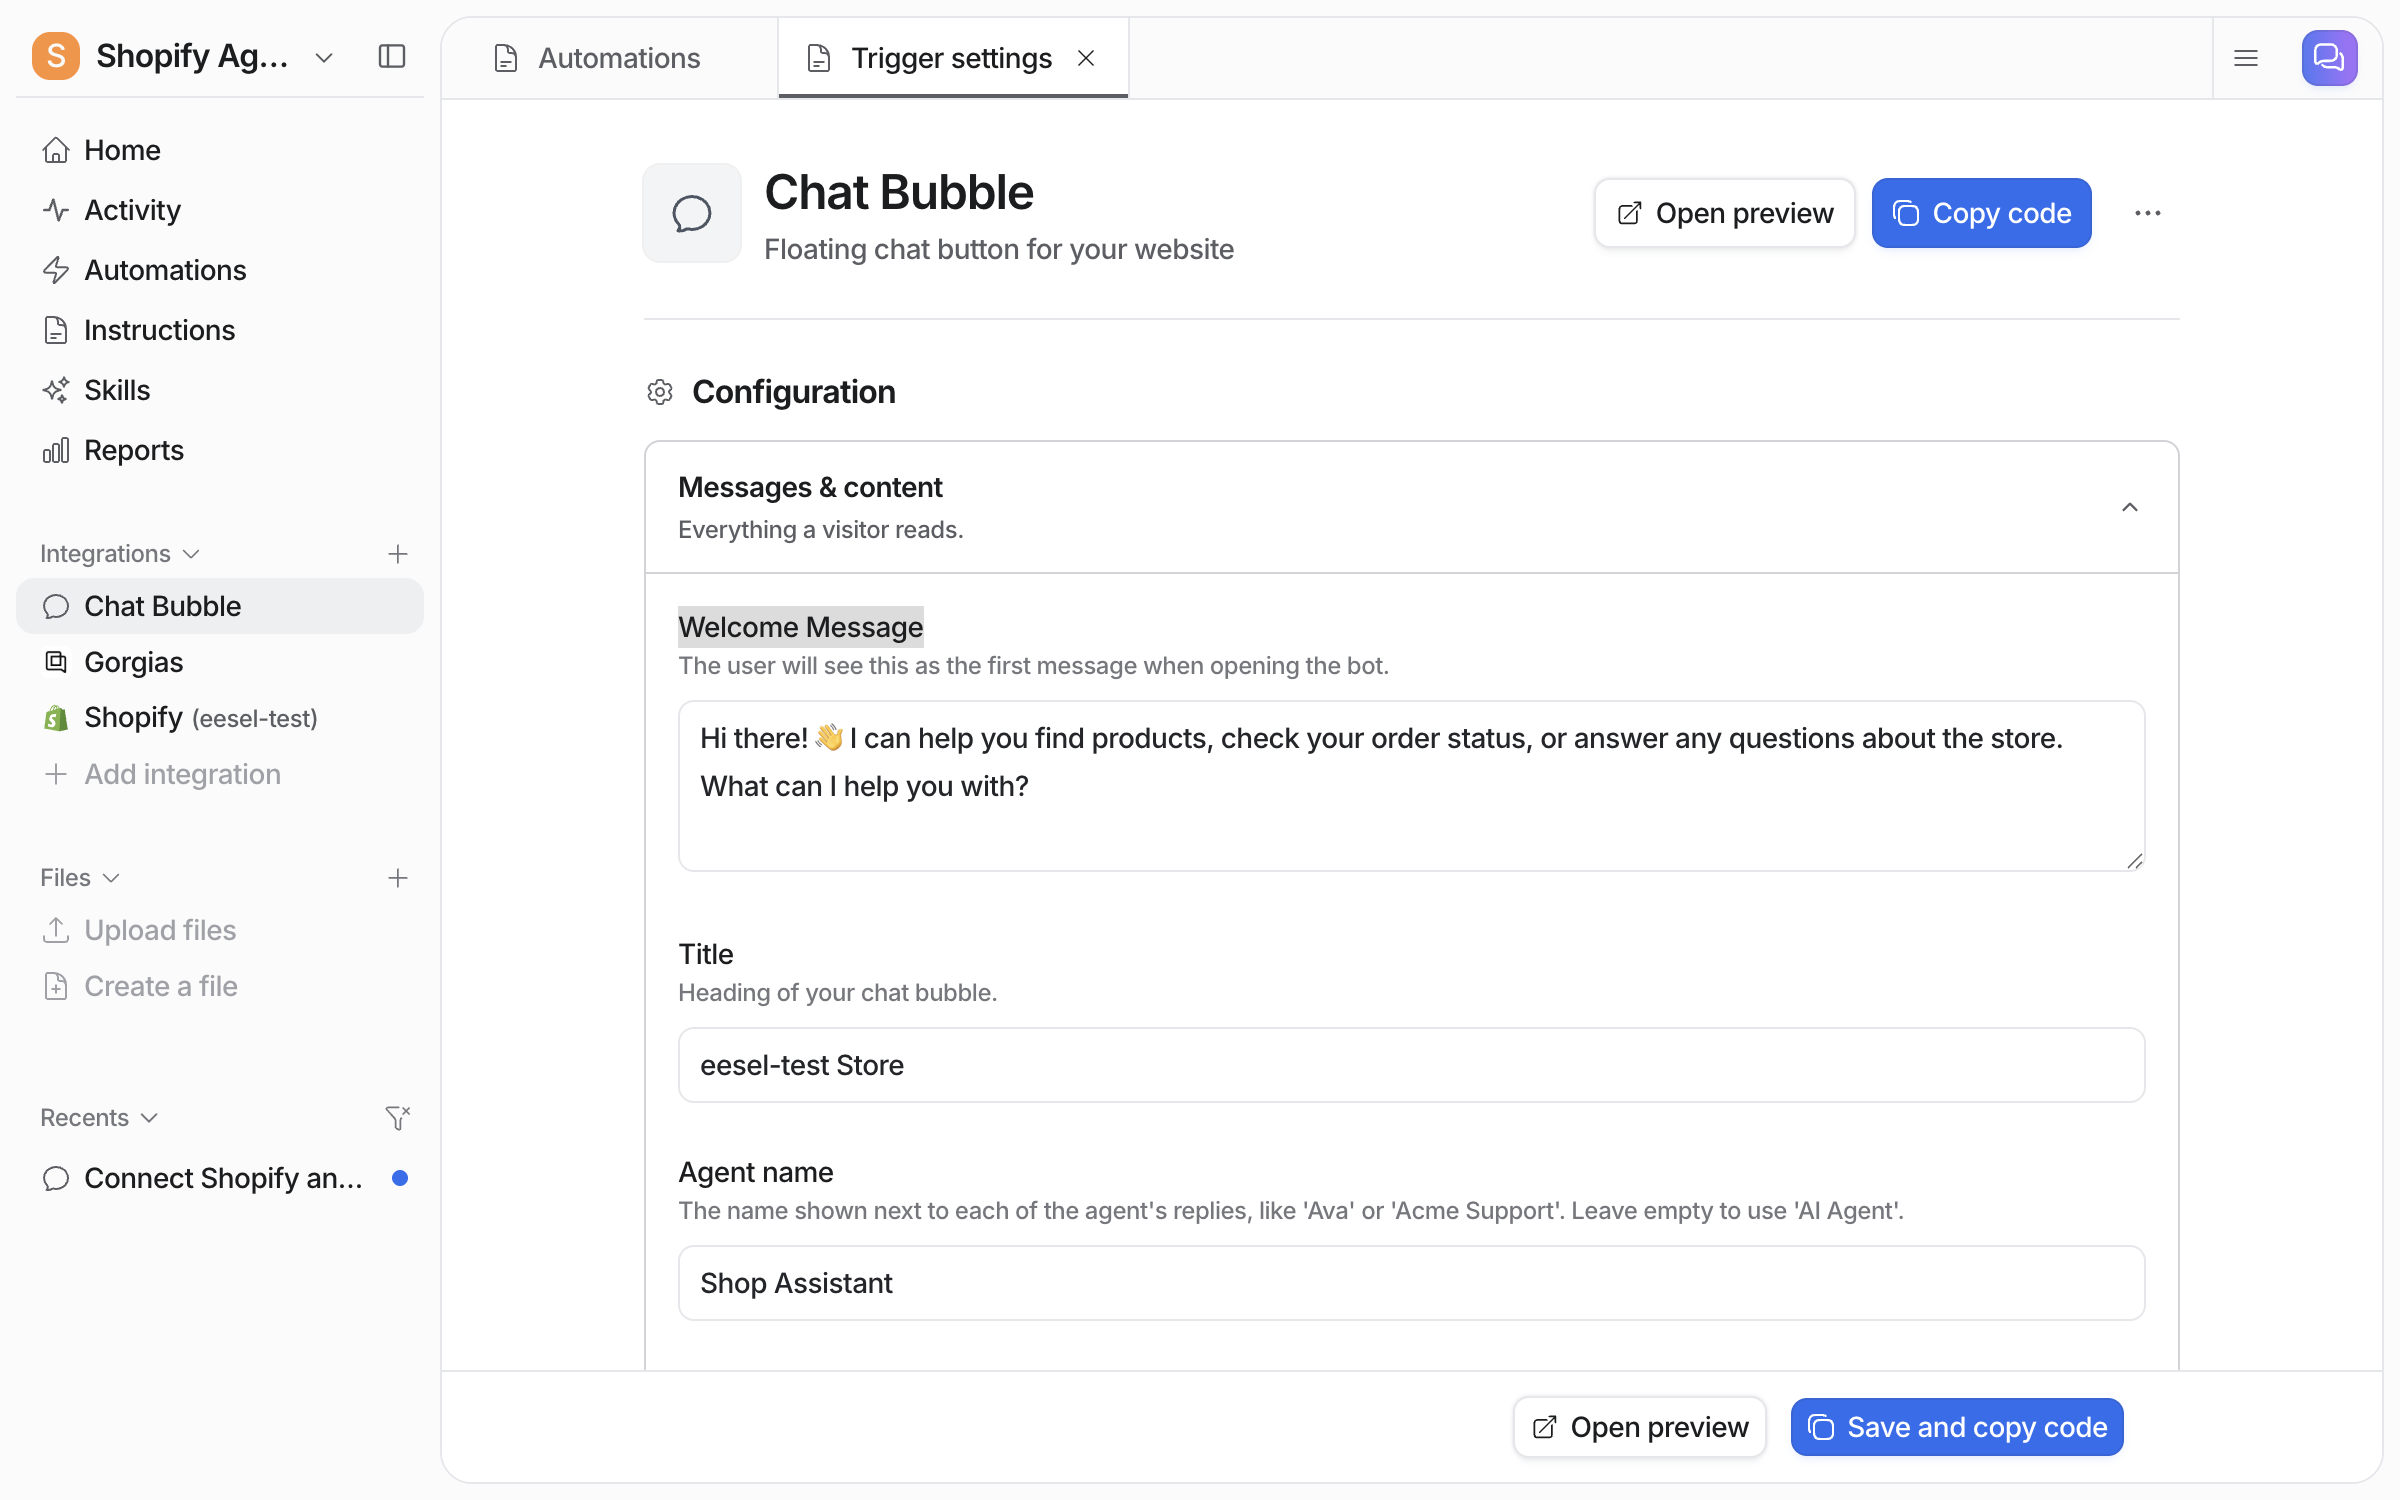
Open Integrations > Chat Bubble in the left sidebar. Open preview and Copy code sit at the top right and follow you down the page. Every field is listed in Chat Bubble settings below.
Messages & content comes first: the Welcome Message, the Title and the Agent name. Leave the name empty and replies are signed "AI Agent".

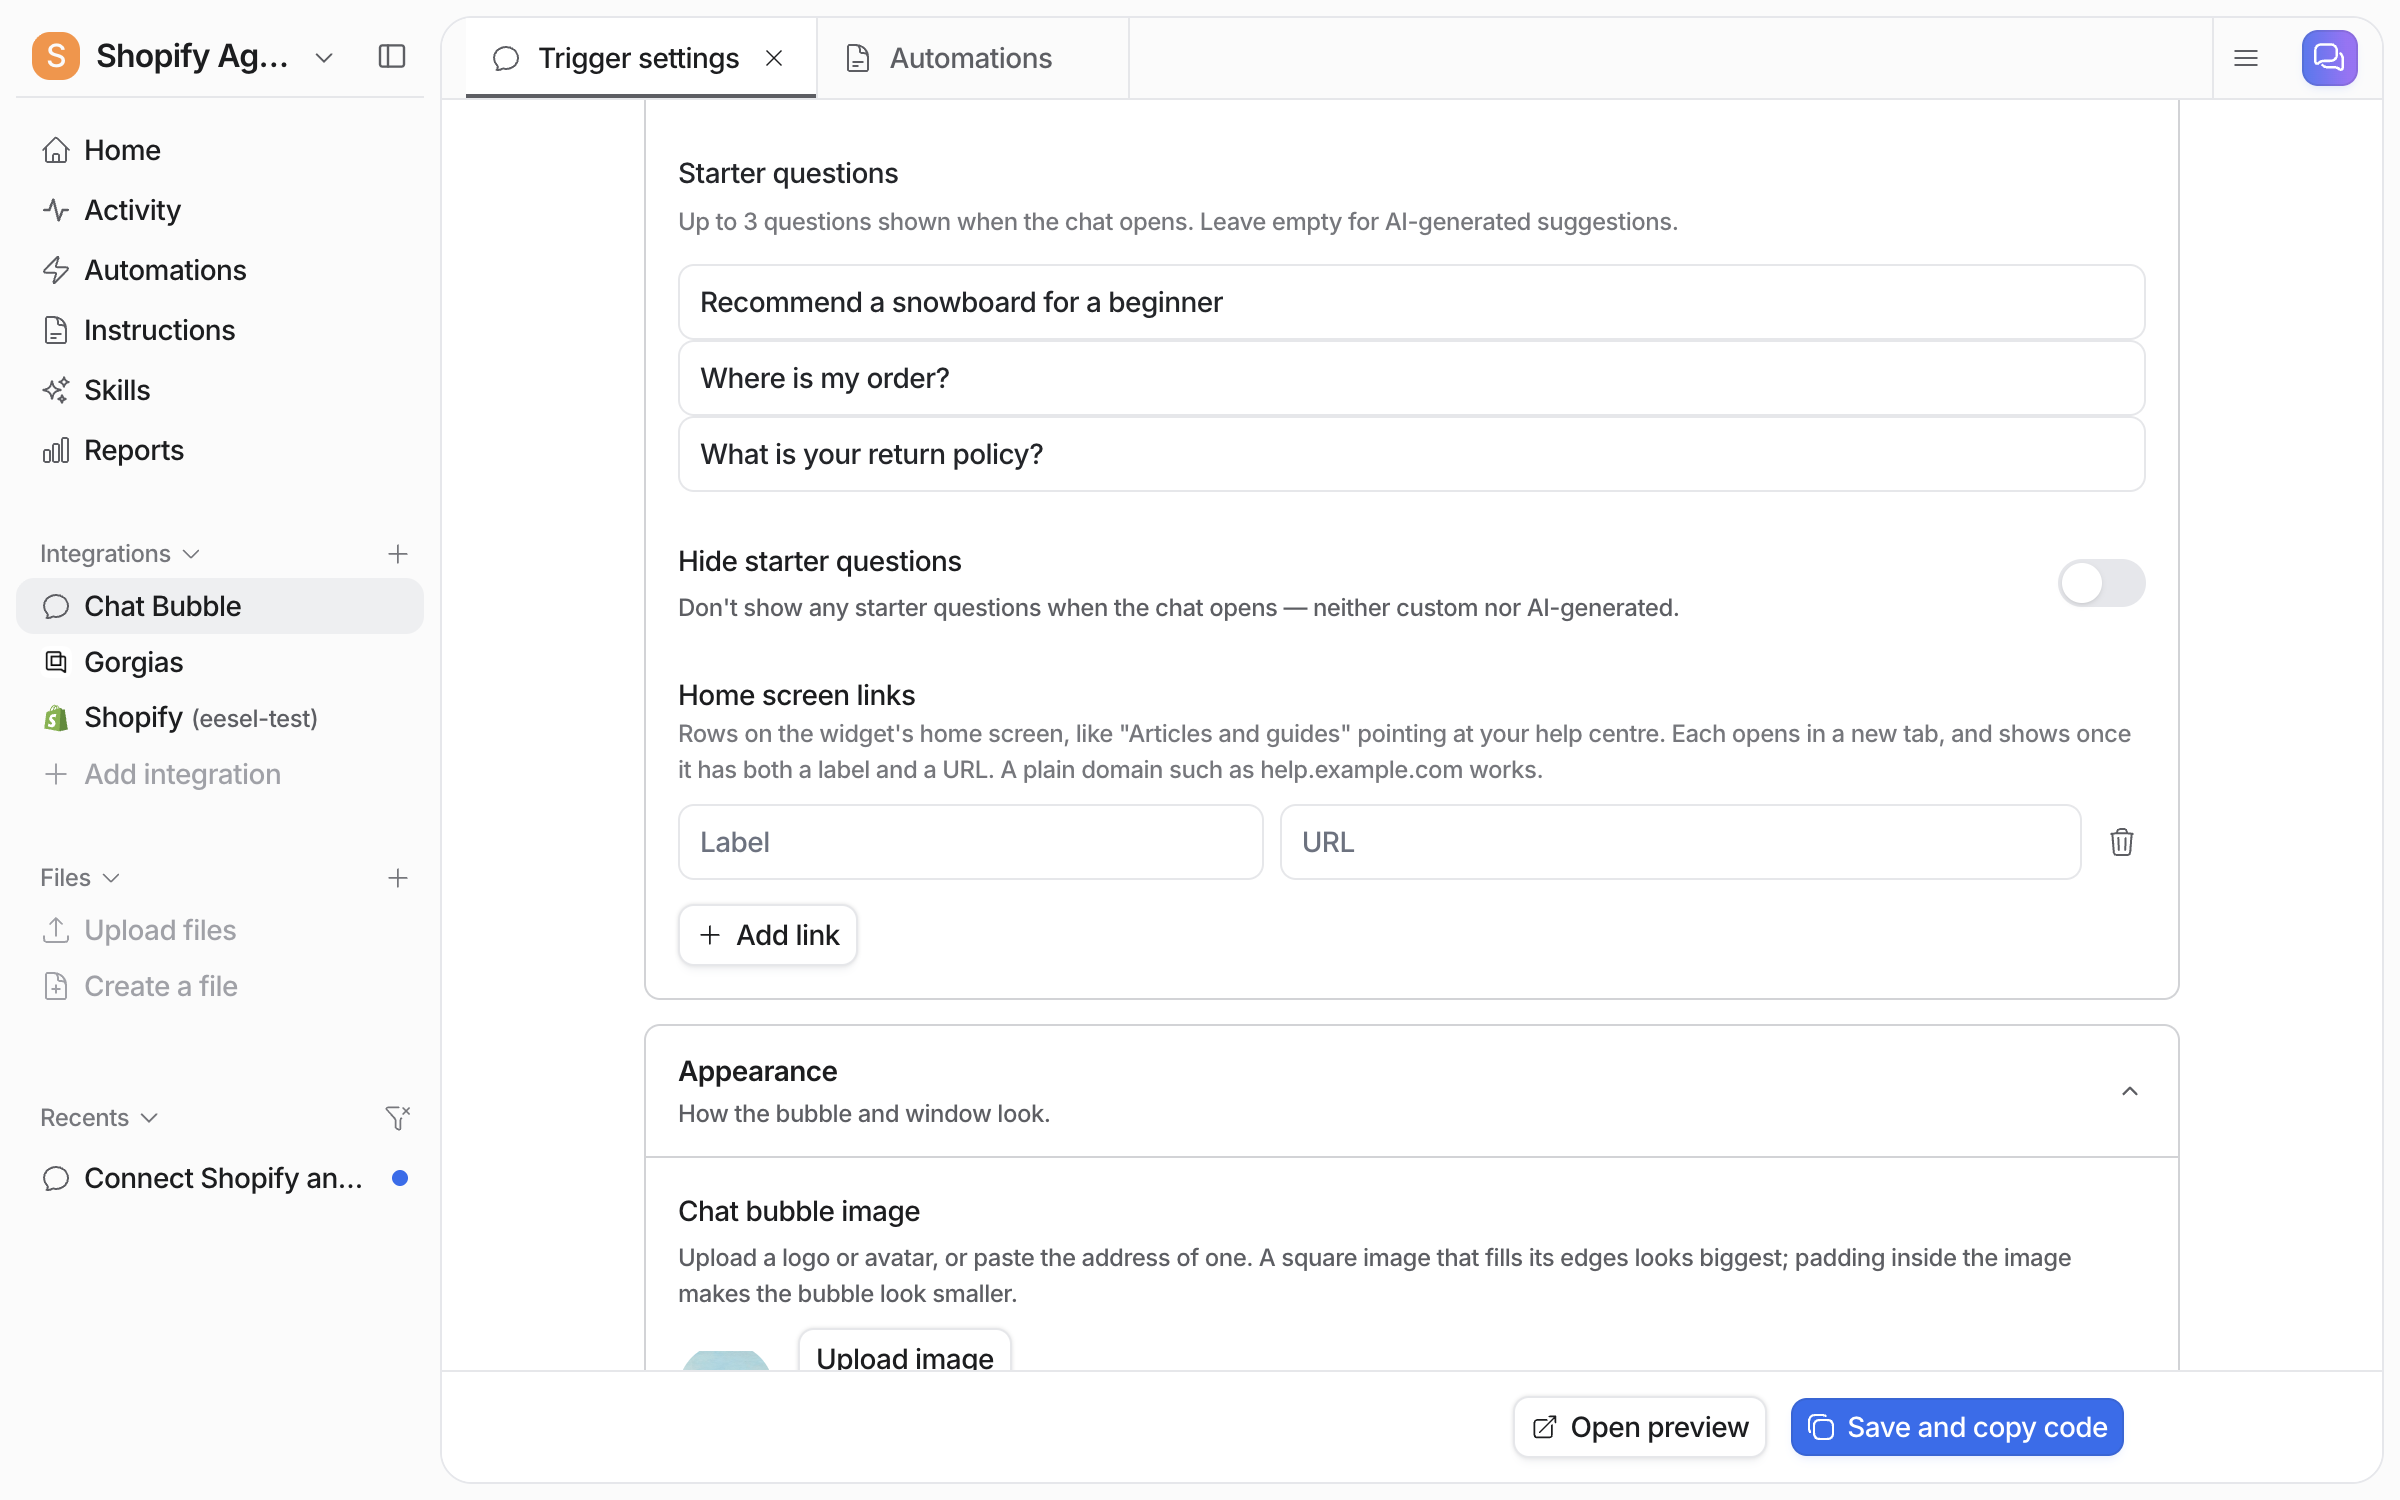
Below that, add up to three Starter questions and any Home screen links. Leave the questions empty and your agent suggests its own. A link shows once it has both a label and an address.

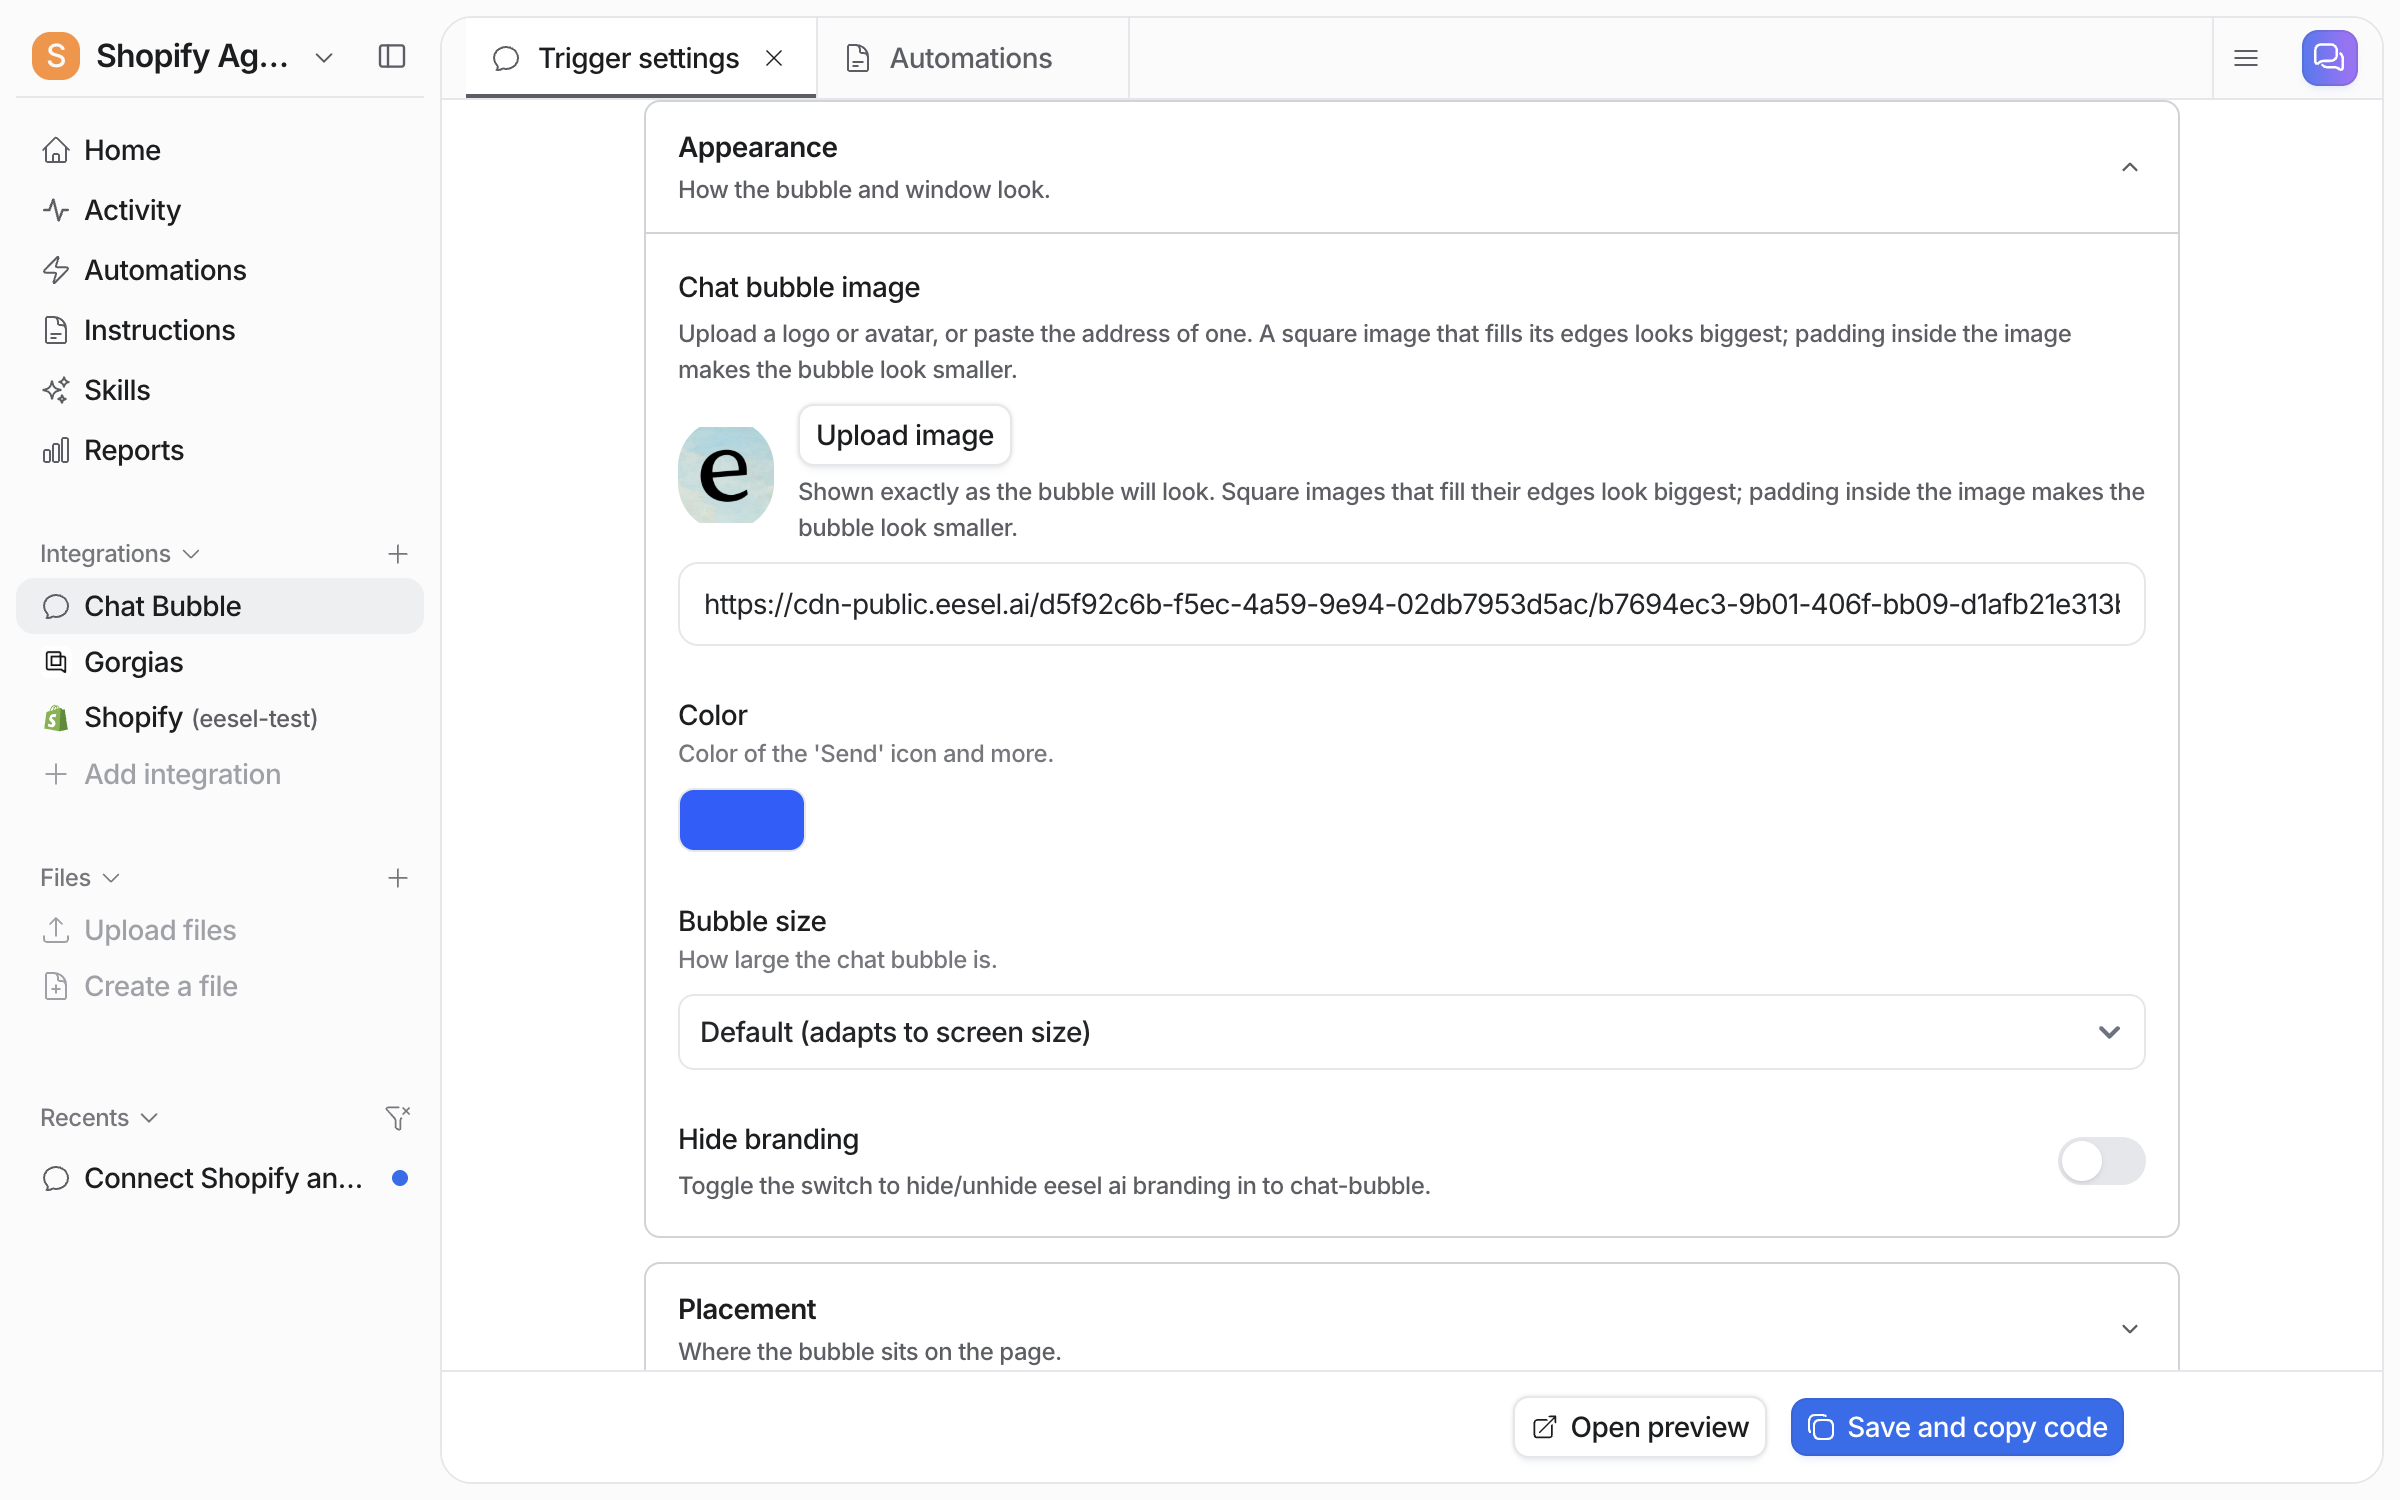
In Appearance, upload a logo for the Chat bubble image or paste its address, then set the Color and Bubble size. A square image that fills its edges looks biggest.

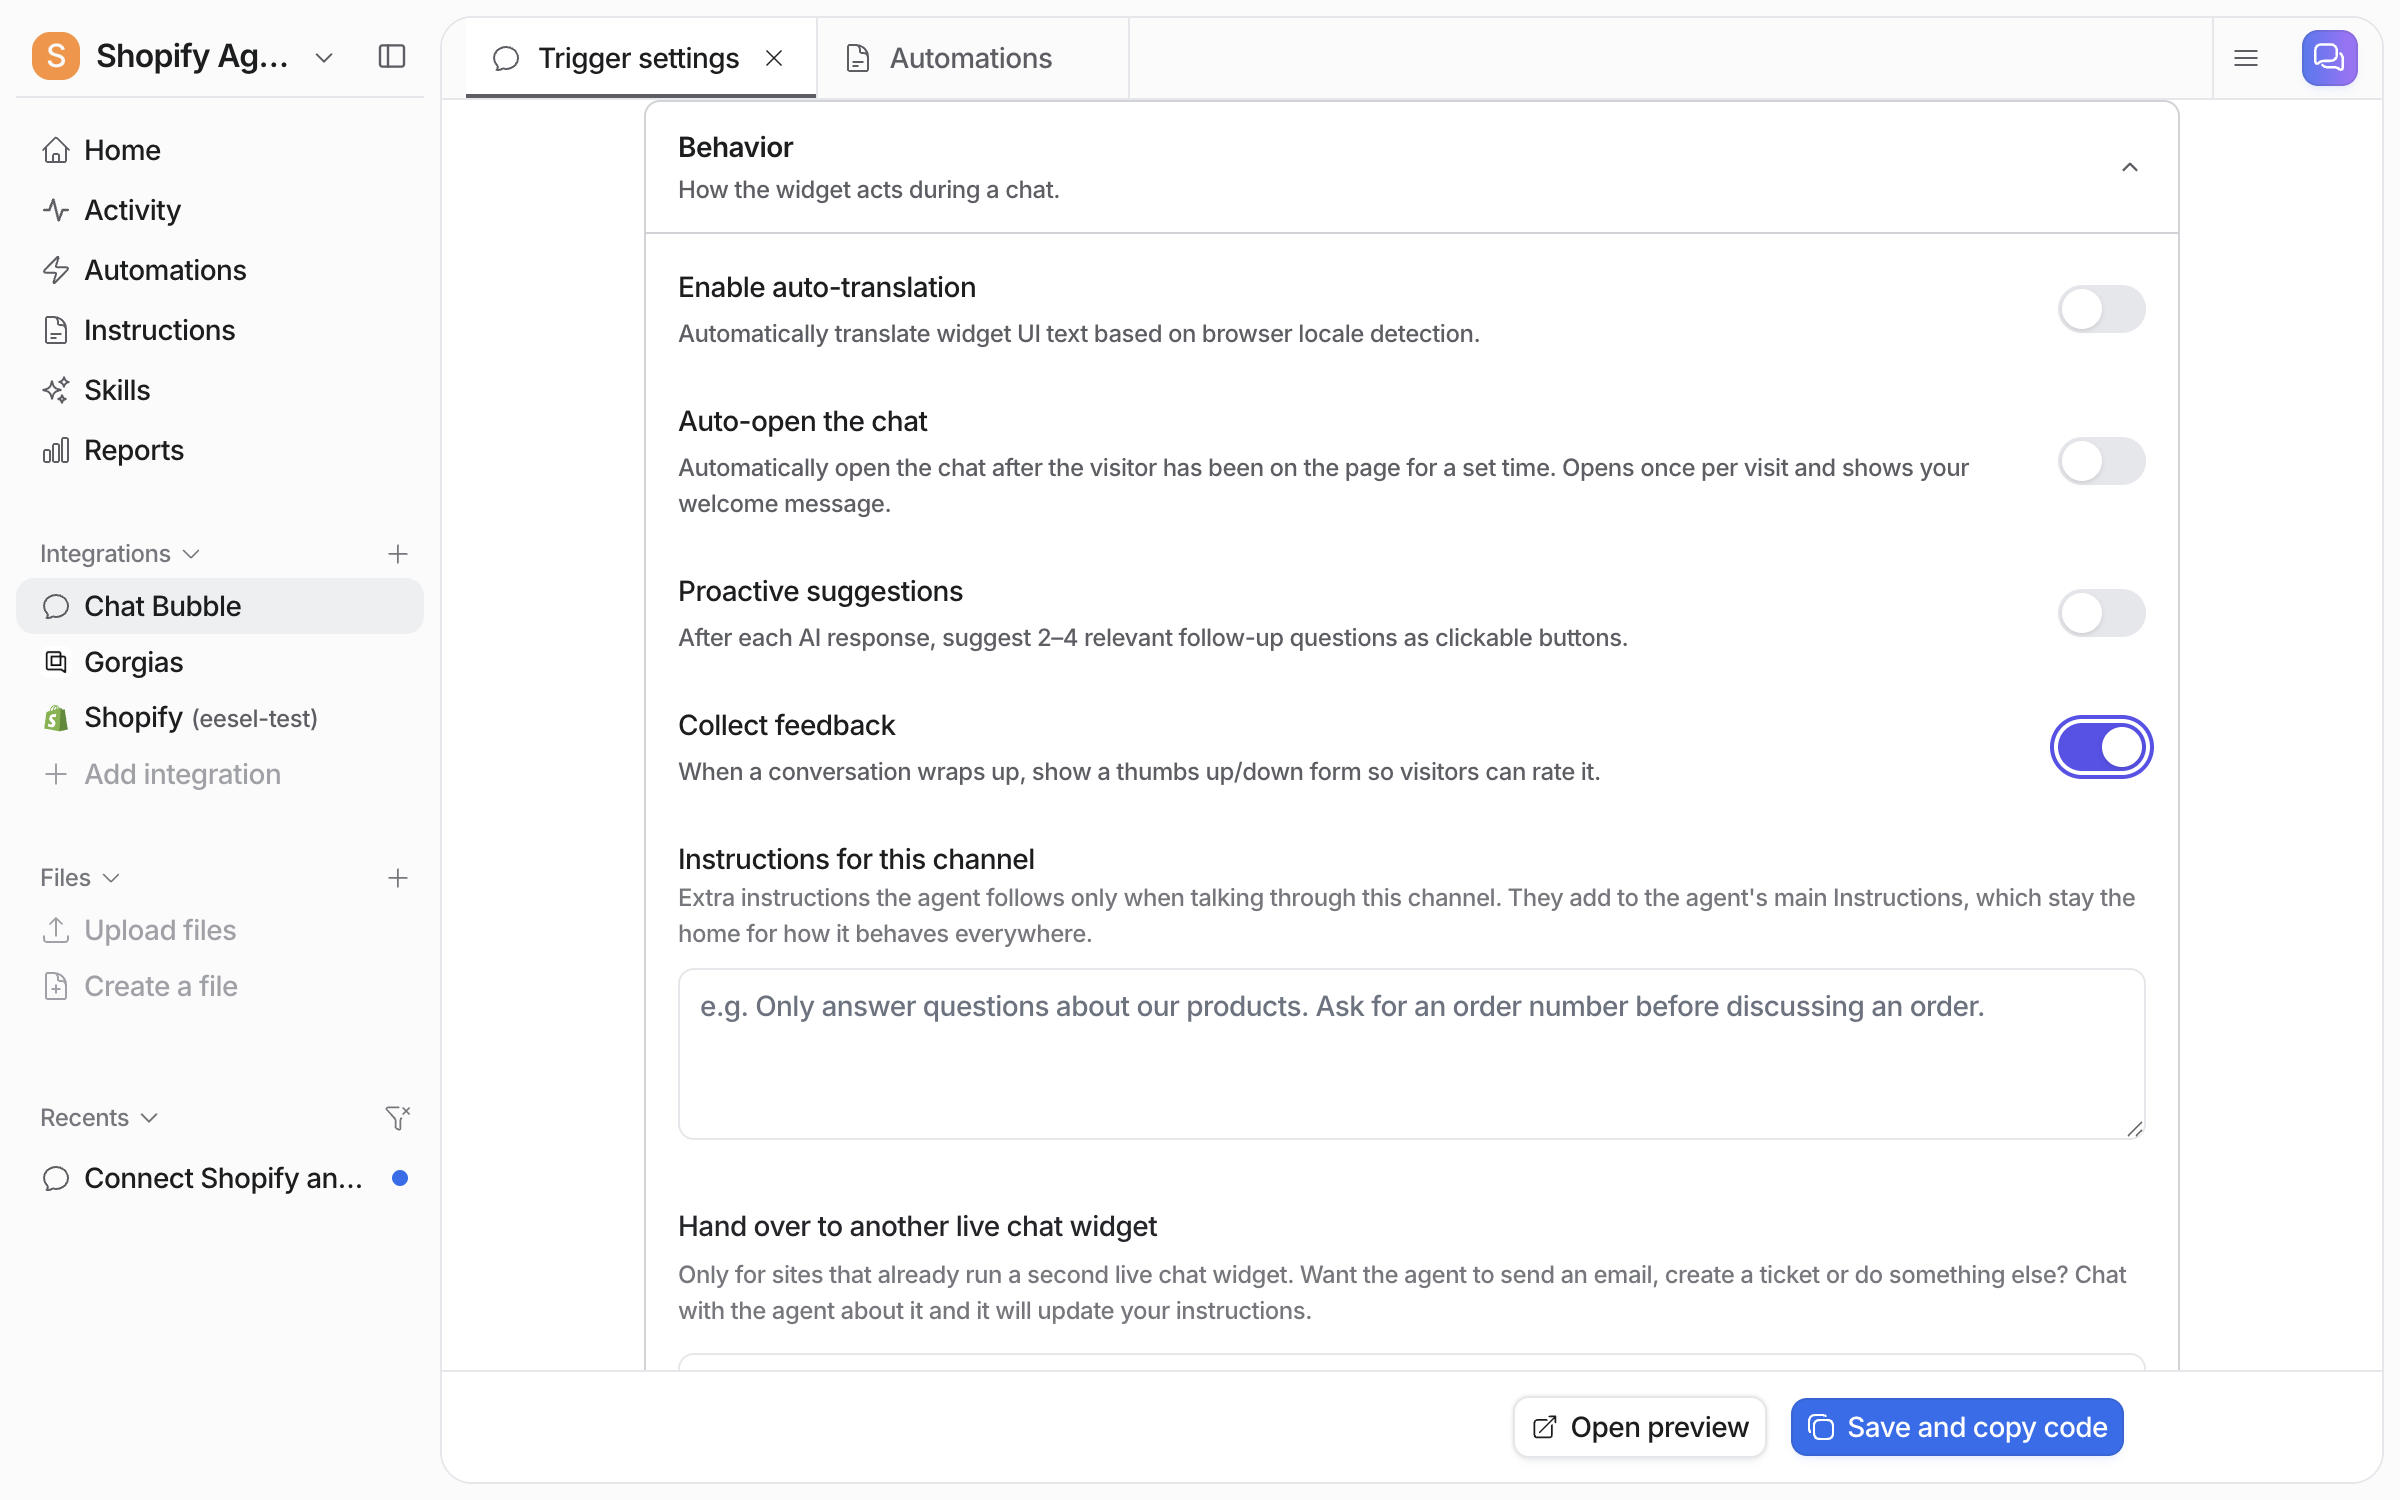
Behavior holds the switches for auto-translation, auto-open, proactive suggestions and feedback collection. It also holds Instructions for this channel. What you write there is added to your agent's main instructions.

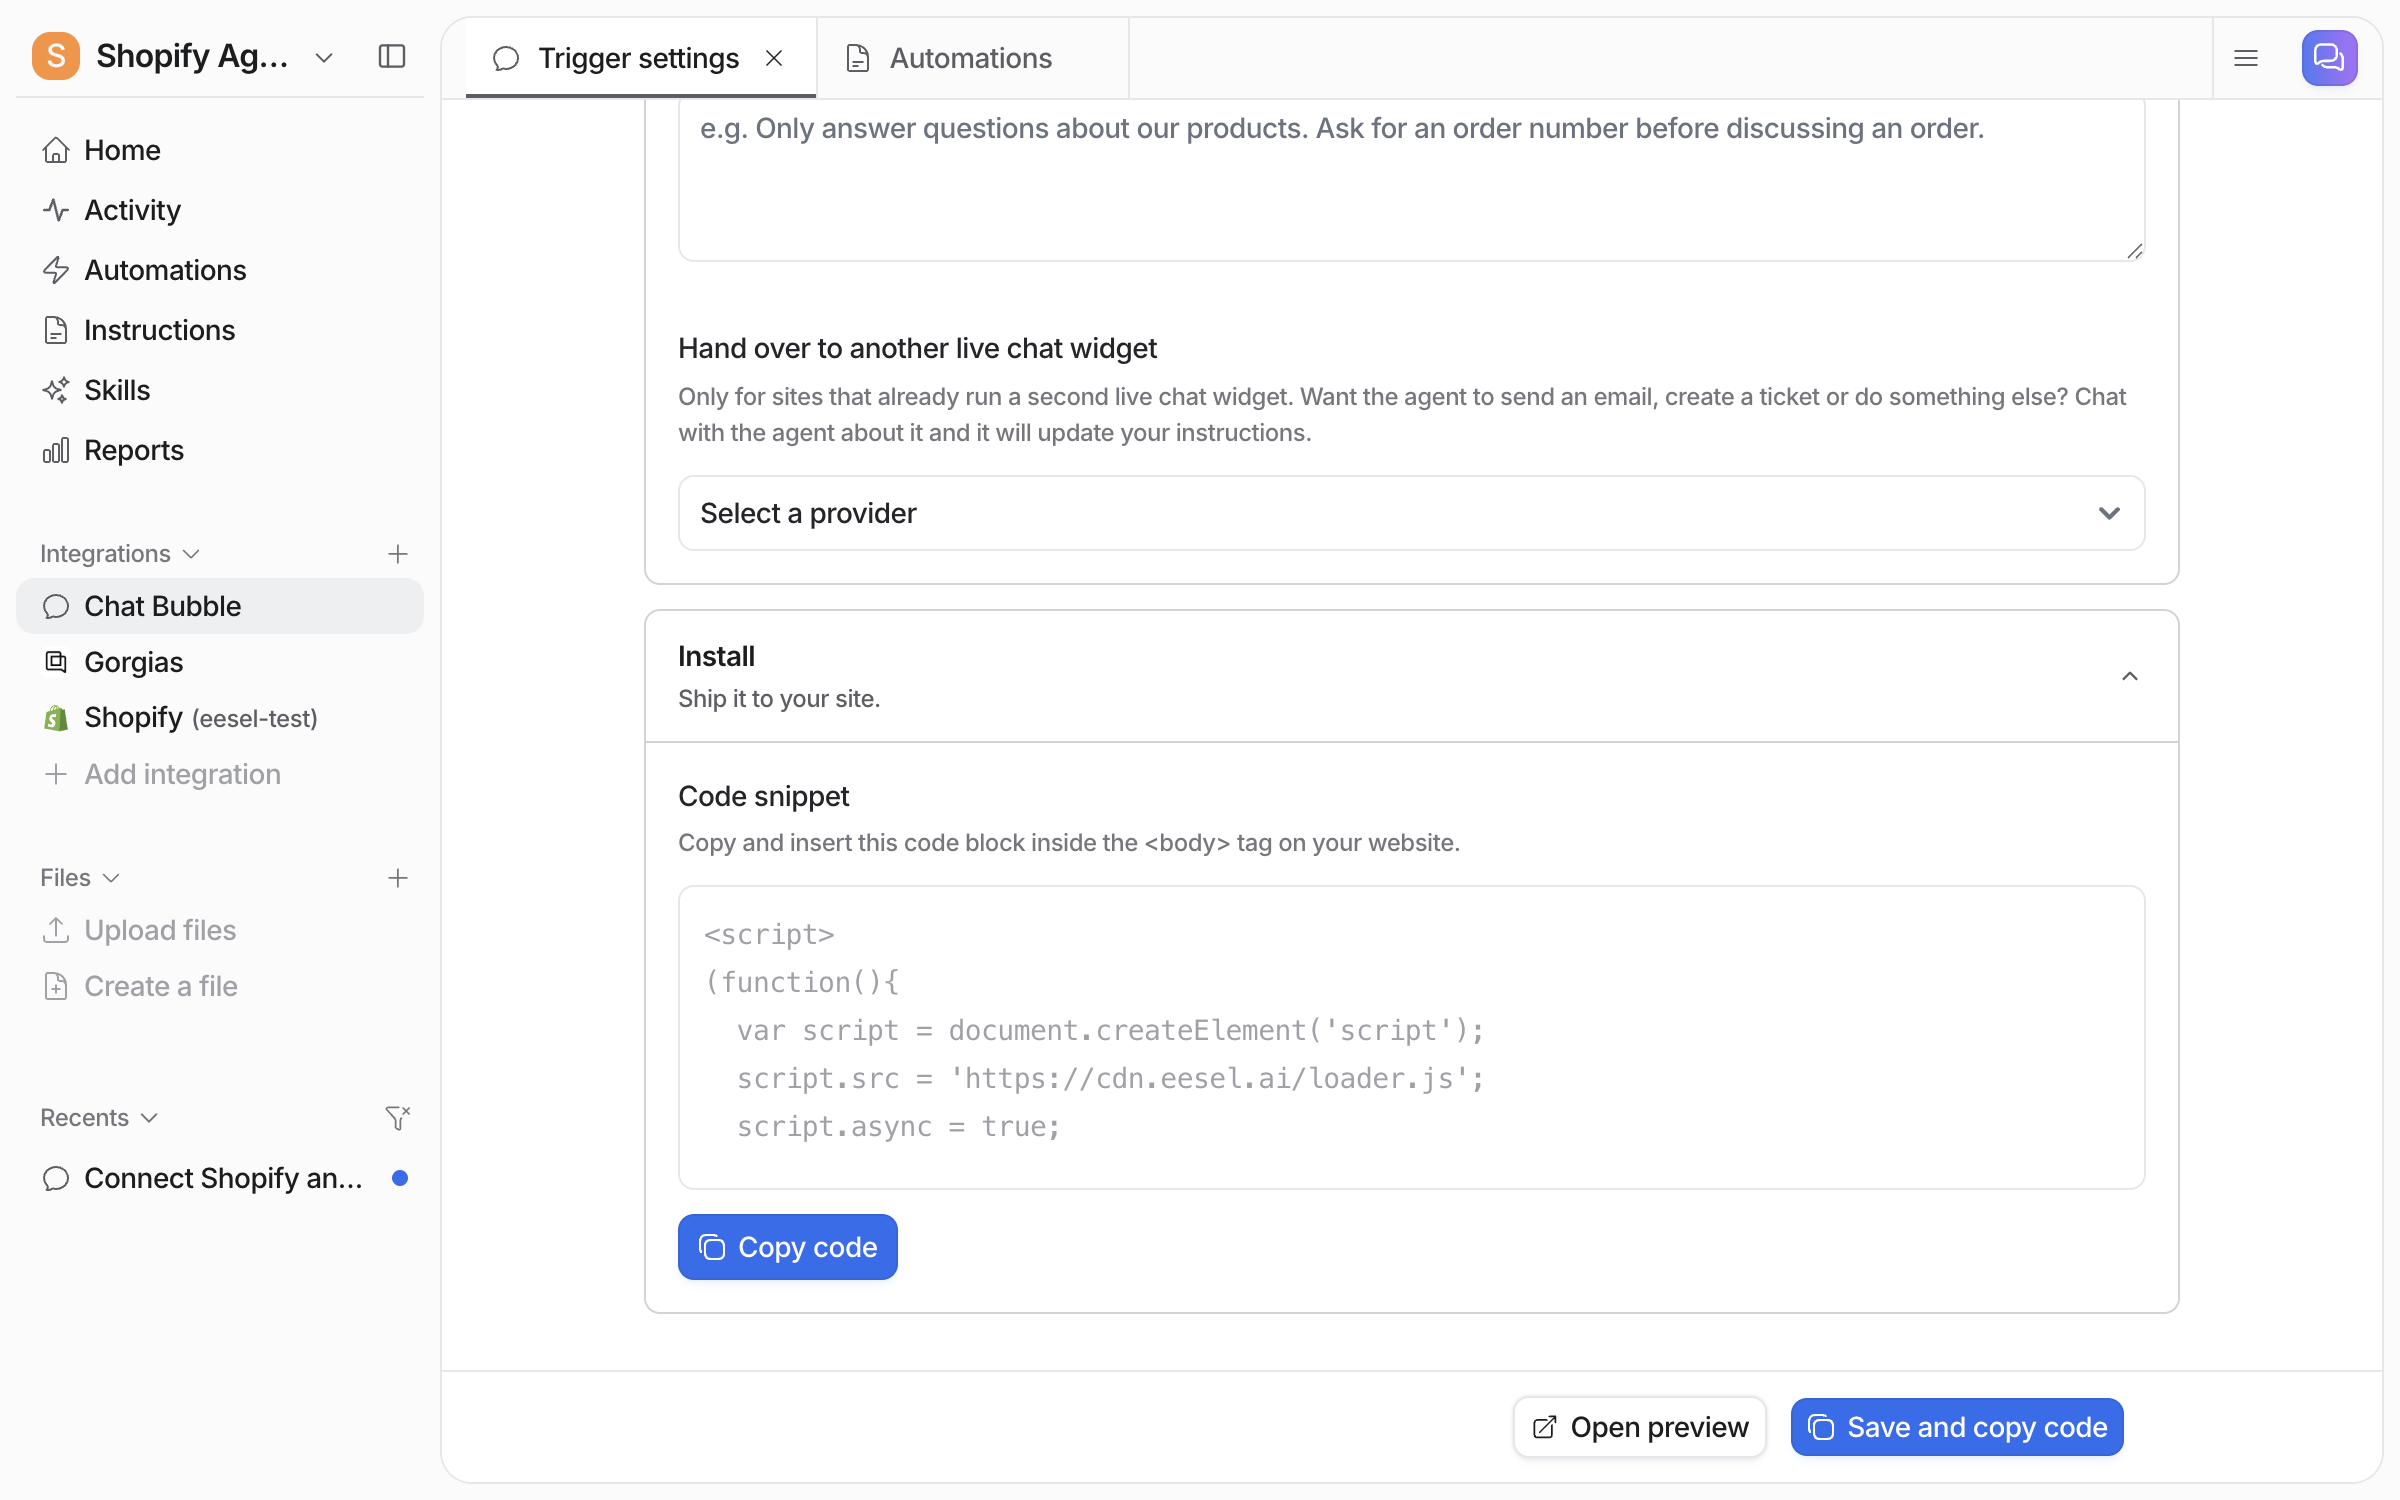
Install holds your Code snippet with your own trigger id. Save and copy code at the bottom saves your changes and copies the snippet in one step.

Add it to your site
Paste the snippet on the line before the closing </body> tag, on every page you want the bubble on. Not sure where that is on your platform? Ask your agent in the dashboard chat.

In your store admin, open Online Store > Themes, then use the menu next to your live theme and pick Edit code.

In the file tree, open Layout > theme.liquid, paste the snippet at the bottom before the closing </body> tag, then click Save. The bubble is live on the storefront from that save.

Your own snippet, with your trigger id in it, is on the settings page. The shape is:
<script>
(function(){
var script = document.createElement('script');
script.src = 'https://cdn.eesel.ai/loader.js';
script.async = true;
script.onload = function() {
if (window.EeselWidgetWithTrigger) {
window.EeselWidgetWithTrigger({ triggerId: 'YOUR_TRIGGER_ID' });
} else {
window.__EESEL_WIDGET_V2_CONFIG__ = { EESEL_TRIGGER_ID: 'YOUR_TRIGGER_ID' };
}
};
document.head.appendChild(script);
})();
</script>It is one script tag and works with any framework. The loader is async, so it does not hold up your page. It loads one small file from cdn.eesel.ai and reads nothing else from your site's code. Updates ship through it, so the snippet never changes.
Try it as a visitor
Open your site and click the bubble. A fresh chat shows your welcome message, the agent name, your starter questions, and the disclaimer line under the input box.

Ask it a question. When a store is connected, it shows the products it names as cards a visitor can scroll and click.

The expand icon at the top right opens the same conversation in full screen.

Hand a conversation to a person
There are two ways to get a person involved.
If your site already runs a second live chat widget, pick it in Hand over to another live chat widget in settings. Your agent opens that widget when a visitor needs a person. Zendesk Messenger appears once Zendesk is connected, and Freshchat once Freshdesk is connected. Off means no handover to another widget.
The second way needs no second widget. Tell your agent in the dashboard chat when to escalate, and what to do then. Creating a helpdesk ticket and sending an email are the usual choices. It writes the handover rules into its instructions and lists the steps back to you.

It links the instructions page and checks any detail it had to guess, such as the inbox address for new tickets.

Open your Instructions page to read what it wrote. The rules are numbered sentences you can edit by hand.

Now test it as a visitor and ask for a real person. Your agent says it will escalate, and asks for the name and email address it needs.

Give it the details. It creates the ticket, tags it, and tells the visitor the ticket number.

Then open your helpdesk. The ticket is there under the visitor's email address. A conversation summary is the first message, and the handover tag is on the ticket.

Chat Bubble settings
Welcome Message
Messages & content
The first message a visitor reads when the chat opens
Title
Messages & content
The heading at the top of the chat window
Agent name
Messages & content
The name shown next to each reply. Empty means "AI Agent"
Input Placeholder
Messages & content
The grey hint text inside the message box
Disclaimer
Messages & content
The small line under the message box, for saying replies come from an AI agent
Starter question 1, Starter question 2, Starter question 3
Messages & content
Up to three clickable questions shown when the chat opens. Leave all three empty and your agent suggests its own
Hide starter questions
Messages & content
Shows no starter questions at all, neither yours nor suggested ones
Home screen links
Messages & content
Up to three label and address rows on the home screen, such as one pointing at your help center. Each opens in a new tab
Chat bubble image
Appearance
The logo or avatar on the bubble. Upload one or paste its address
Color
Appearance
The colour of the send icon and the accents
Bubble size
Appearance
How large the bubble is. Default adapts to the screen, or pick Small, Medium, Large or Custom
Custom size
Appearance
Width and height of the bubble in pixels, 40 to 96. Shows only when Bubble size is Custom
Hide branding
Appearance
Removes the "Powered by eesel" line
Bubble position
Placement
Which corner of the page the bubble sits in, bottom right or bottom left
Side offset
Placement
Distance from the left or right edge of the page, in pixels
Bottom offset
Placement
Distance from the bottom of the page, in pixels. Raise it to clear a cookie banner or a sticky footer
Enable auto-translation
Behavior
Matches the window's own wording to the visitor's browser language
Auto-open the chat
Behavior
Opens the chat once per visit after a set time, showing your welcome message
Delay before opening (seconds)
Behavior
How long the visitor is on the page before the chat opens, 1 to 300. Shows only when Auto-open the chat is on
Proactive suggestions
Behavior
Offers two to four follow-up questions as buttons after each reply
Collect feedback
Behavior
Shows a thumbs up and down form when a conversation wraps up
Instructions for this channel
Behavior
Extra instructions your agent follows only in the bubble. They add to your agent's main instructions
Hand over to another live chat widget
Behavior
Opens a second live chat widget you already run, for sites that have one. Zendesk Messenger and Freshchat, and only ones you have connected. Off means no handover to another widget
Link to use if the widget is missing
Behavior
Where to send the visitor when that widget is not on the page. Empty means the handover is skipped. Shows only when a provider is picked
Code snippet
Install
The script to paste on your site, with your own trigger id
Saved settings reach a live bubble in about 30 seconds.
Add it to other platforms
Every platform has a place for a script that runs on every page.
WordPress, Webflow, Squarespace. The theme's footer, "custom code" or "scripts" setting.
Docusaurus. Paste it into
src/theme/Root.js, or add it through theheadTagsoption, so it renders on every page.Magento. The plain snippet never renders. Magento loads RequireJS, which sets
define.amd, and the loader then takes the wrong path. Use the wrapper below, which clearsdefine.amdwhile the loader runs and puts it back after.
Next.js (App Router). In app/layout.tsx, render it once with next/script so it survives a client-side page change:
With the trigger id in NEXT_PUBLIC_EESEL_TRIGGER_ID, preview and local builds can leave it unset and show no bubble. For a strict Content Security Policy, allow https://cdn.eesel.ai for scripts and connections.
Two other ways to reach the same agent. Inline Chat embeds the chat inside a page rather than as a floating button. Public Chat is a hosted link you can share. Both take meta.-prefixed query parameters, so you can pass who the visitor is.
Sources, triggers and actions
Sources
The bubble is not a source, and nothing typed in it becomes knowledge. Its answers come from what else you have connected: your website, help center, docs and files. With a store such as Shopify connected, it can also talk about products, stock and orders. See Integrations.
Triggers
The bubble has one trigger, and its automation is created for you when the bubble is set up.
Chat Bubble
A visitor sends a message in the bubble on your site
Answering and selling on your own pages
chat_bubble
The trigger event is fixed when the automation is created. So a new automation is required for each different trigger event. Each site you put a bubble on gets its own automation and its own trigger id.
Actions
The bubble has no actions of its own. What your agent can do for a visitor comes from the other integrations on it. Looking up an order in your store is one, and creating a helpdesk ticket is another. Each runs on its own, asks you first, or stays off. A handover to a helpdesk uses two write actions, create ticket and add tags, and both start on Needs approval, so the first handover waits for a person. Switch on those two on the helpdesk's integration page and leave the rest as they are: switching every action to Auto also ungates refunds and cancellations on a connected store. An approval waits in your dashboard, with Approve, Always allow and Deny buttons. See Actions and Approvals.
Troubleshooting
FAQ
Related pages
E-commerce Sales Rep for the job your agent does for shoppers on your site
Helpdesk for the customer-facing work it picks up after a handover
Actions and Approvals for setting each action to run on its own, ask you first, or stay off
Integrations overview for how sources, triggers and actions fit together
Last updated